iPhone Backup and Restore: Complete Data Protection Guide 2025
Keeping your iPhone data safe is more important than ever. Whether it’s personal photos, business documents, or years of messages, a proper backup ensures you can recover everything without stress. This complete guide will walk you through every method to back up and restore your iPhone, from quick PC transfers to cloud-based solutions with step-by-step instructions that work in 2025.
iPhone Backup to PC: Windows & Mac Complete Guide
Backing up your iPhone to a computer offers faster transfer speeds, higher storage capacity, and the comfort of offline control. It’s also essential for users who prefer full-device backups without relying solely on iCloud.
iPhone Backup on Windows PC: Step-by-Step Mastery
Why choose this method?
A PC backup stores everything, photos, contacts, settings, and app data locally. This allows you to restore your iPhone even without an internet connection.
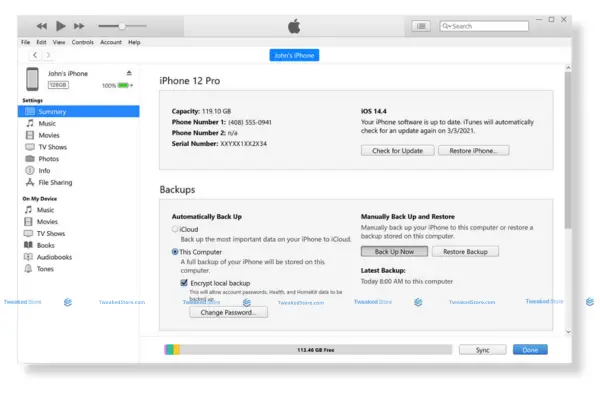
How to Back Up Your iPhone on Windows 11
- Install iTunes (latest version) from the Microsoft Store.
- Connect your iPhone via USB or enable Wi-Fi syncing.
- Open iTunes and select your device in the top-left menu.
- Click “Back Up Now” under “Manually Back Up and Restore.”
- For added protection, enable Encrypt Local Backup to secure passwords, Health data, and Wi-Fi settings.
iPhone Backup Location in Windows 11
Default folder:
C:\Users\[YourUser]\Apple\MobileSync\Backup\
- To manage backups: Open iTunes > Edit > Preferences > Devices.
USB vs. Wi-Fi Backup Speeds
- USB: Faster (especially for first-time backups).
- Wi-Fi: Convenient for incremental backups, but slower.
Pro Tip: For large media libraries, always use USB to avoid delays.
Security Settings for Smooth Backups
- Ensure Windows Defender or antivirus software allows iTunes connections.
- Trust your computer when prompted on your iPhone.
Quick, complete backups without relying on internet speed, perfect for large data sets.
iPhone Backup Mac PC: Native Integration Advantages
Why it’s better on Mac?
Post-iTunes, macOS offers Finder-based backups, integrated with system tools like Time Machine for automated protection.
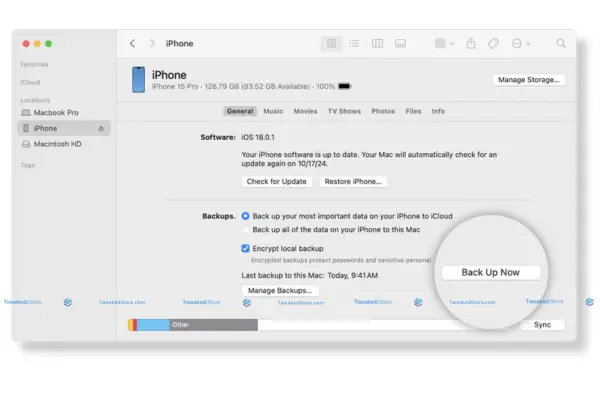
Backup via Finder (macOS Ventura, Sonoma, Sequoia)
- Connect your iPhone via USB or Wi-Fi.
- Open Finder and select your iPhone under “Locations.”
- Choose Back Up All of the Data on Your iPhone to This Mac.
- Click Back Up Now.
Time Machine Integration
- Back up your Mac (including iPhone backups) to an external drive automatically.
- This creates a multi-layered safety net in case your Mac’s storage fails.
Cross-Device Backup Sync
- Apple ID-based syncing ensures your Mac and iPhone share data like Messages, Photos, and Notes, even if you restore only partial backups.
Native macOS tools make backups faster, more secure, and seamlessly integrated with your Apple ecosystem.
How to Backup iPhone to PC Without iTunes
Why skip iTunes?
While iTunes is still functional, many users prefer modern alternatives for speed, flexibility, and more control over their data. Backing up your iPhone without iTunes can mean easier selective backups, faster transfers, and fewer system conflicts.
Modern Alternatives That Outperform iTunes
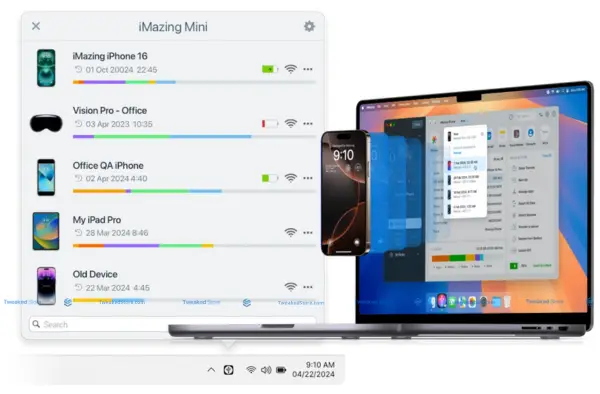
- iMazing – Full-device or selective backups, automatic scheduling, and direct access to app data.
- AnyTrans – Cross-platform transfer between iPhone, Android, and cloud drives.
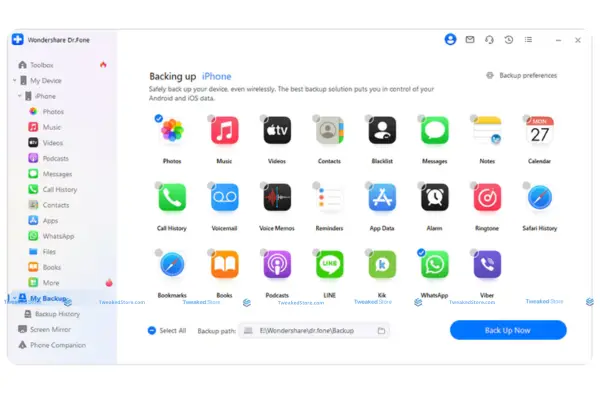
- Dr.Fone – Strong focus on recovery options alongside backups.
Direct File System Access Methods for Advanced Users
- Use iPhone file managers to mount your device like a USB drive, allowing direct copy of photos, videos, and documents.
- Great for developers or power users who want to extract app files, system logs, or configuration data.
- Caution: Avoid altering system files to prevent iOS instability.
Batch Backup Scheduling for Multiple Devices
- Enterprise tools like iMazing Configurator can back up multiple iPhones on a schedule — ideal for businesses, schools, or IT teams.
- Store backups on network-attached storage (NAS) for centralized management.
Selective Data Backup Strategies to Save Storage Space
- Backup only what you need — for example, contacts, messages, or photos — instead of full device images.
- This can reduce backup size from 100GB+ to under 10GB, saving both time and disk space.
Gain faster, more flexible backups with the ability to keep only the data you truly need.
iPhone Backup Free Solutions That Actually Work
Why look for free options?
Not everyone needs premium tools. With the right setup, you can protect your iPhone data for free without losing essential features.
Windows Built-In Backup Capabilities Most Users Miss
- Photos App Import – Directly transfer images and videos without third-party apps.
- File Explorer Access – Copy certain file types straight from your iPhone to PC over USB.
- Windows Backup (OneDrive) – Syncs important documents and media to the cloud automatically.
Free Third-Party Tools with Enterprise-Level Features
- Syncios Free Edition – Transfer and back up core data without limitations on file count.
- CopyTrans Shelbee Free – Supports full or partial iPhone backups on PC.
- iExplorer Demo Mode – Allows limited but useful manual file extractions.
Cost Comparison: Free vs. Paid Backup Solutions
- Free Tools – Perfect for occasional backups and smaller data sets.
- Paid Tools – Offer scheduled automation, multi-device support, advanced recovery, and faster transfers.
- Rule of thumb: If you back up once a month or less, free is fine; for daily or enterprise use, invest in premium.
Hidden Costs in “Free” Backup Services and How to Avoid Them
- Some “free” apps limit restore options unless you pay.
- Cloud backups may be free up to a small quota (e.g., 5GB with iCloud, 15GB with Google Drive), then require paid storage upgrades.
- Avoid tools that lock data behind proprietary formats unless you commit to their paid tier.
Reliable, cost-effective backups without unnecessary software subscriptions.
iPhone Backup using iTunes: Legacy Method Optimization
Even though Apple phased out iTunes on macOS in favor of Finder, it remains a reliable iPhone backup method on Windows and older Macs. For users who prefer local storage, iTunes offers a complete device snapshot essential for full restores without cloud dependency.
iTunes Backup Troubleshooting: Common Issues Solved
iTunes Not Recognizing iPhone: Driver and Connection Fixes
- Update Apple Mobile Device USB Driver in Windows Device Manager.
- Use the original Apple Lightning cable.
- Restart both your PC and iPhone before reconnecting.
- On Mac, ensure the latest macOS/iTunes updates are installed.
Backup Corruption Prevention and Early Warning Signs
- Check free disk space before starting a backup.
- Avoid disconnecting the iPhone during transfer.
- Periodically delete outdated backups to prevent version conflicts.
iTunes Backup Encryption: When to Use and Security Implications
- Turn on encryption to save Wi-Fi passwords, Health data, and app logins.
- Store your encryption password securely — without it, the backup can’t be restored.
Performance Optimization for Faster iTunes Backup Completion
- Close other apps to free system resources.
- Use USB 3.0 ports for optimal transfer speed.
- For large backups, disable unnecessary app data before starting.
Resolves the most common roadblocks to smooth, secure iTunes backups.
iTunes vs. Modern Backup Methods: Honest Comparison
Why Apple Moved Away from iTunes
- iTunes became bloated with music, movies, and device management combined.
- Finder and cloud solutions offer simpler, faster backups without extra clutter.
Legacy iTunes Advantages That Still Matter in 2025
- Works on older systems where Finder isn’t available.
- Full offline control without cloud subscriptions.
- More consistent compatibility with older iOS versions.
Migration Strategies from iTunes to Newer Solutions
- Export existing backups to Finder-compatible formats.
- Test iCloud or modern software on non-critical devices first.
Maintaining iTunes Backups While Transitioning
- Keep iTunes installed for archived backups.
- Run both methods in parallel until you’re confident with the new system.
How to Backup iPhone to iTunes on Different Operating Systems
iTunes on Windows: Installation, Updates, and Optimization
- Download from the Microsoft Store or Apple’s official site.
- Regularly check for updates to avoid compatibility issues.
iTunes Backup File Management and Organization Strategies
Backup location:
C:\Users\[YourUser]\Apple\MobileSync\Backup\
- Rename folders with dates to keep multiple versions organized.
Batch Processing Multiple iPhone Backups Through iTunes
- Connect devices one at a time, backing up each in sequence.
- Store backups on an external drive to save PC storage space.
iTunes Backup Verification: Ensuring Data Integrity
- In iTunes, go to Edit > Preferences > Devices and check backup timestamps.
- Use third-party verification tools to test backup restorability.
Consistent backups across multiple systems with verifiable data safety.
iPhone Backup Extractor: Advanced Data Recovery Tools
When you can’t restore your iPhone normally or only need specific files from a backup an iPhone backup extractor can save the day. These tools read and recover data from iTunes or Finder backups, even if they’re partially corrupted.
Professional iPhone Backup Extractor Tools Reviewed
Feature Comparison of Leading Backup Extractor Software
- iMazing – Selective restore, encrypted backup reading, cross-device support.
- iPhone Backup Extractor (Reincubate) – Forensic-grade data recovery, password bypass support.
- Dr.Fone Toolkit – Strong recovery tools for deleted media and messages.
iPhone Backup Extractor for Forensic Data Recovery
- Used in corporate investigations, law enforcement, and compliance audits.
- Can access metadata, timestamps, and deleted file remnants.
Selective Data Extraction from Corrupted Backups
- Recover contacts, messages, and photos even if the backup won’t fully restore.
Legal and Ethical Considerations for Backup Extraction
- Only extract data from devices and accounts you own or have permission to access.
- Be aware of jurisdictional data privacy laws.
Note: Gives access to critical files even from damaged backups.
iPhone Backup Software: Enterprise vs. Consumer Solutions
Scalable Backup Solutions for Businesses and Families
- Centralized management with multi-device scheduling.
- Role-based access for IT admins and end users.
Cloud Integration Capabilities and Hybrid Backup Strategies
- Store backups locally and in the cloud for redundancy.
- Use hybrid NAS + cloud systems for large-scale deployments.
Automated Backup Scheduling with Smart Conflict Resolution
- Schedule overnight backups to avoid work disruption.
- Automatically detect and resolve file conflicts between versions.
Backup Compression and Encryption for Storage Optimization
- Reduce backup size by up to 70% with compression.
- Use AES-256 encryption to protect sensitive files.
Free vs. Premium Backup Extractors: What You Get
Open-Source Backup Extraction Tools and Their Limitations
- Examples: libimobiledevice, iBackup Viewer (basic version).
- Often lack advanced features like encrypted backup decryption.
Premium Feature Breakdown: Is Paid Software Worth It?
- Paid versions often include full restore capabilities, unlimited file recovery, and customer support.
- Faster extraction speeds and better compatibility with latest iOS updates.
Security Implications of Free Backup Extraction Tools
- Some may lack encryption safeguards or transmit data insecurely.
Data Privacy Considerations When Choosing Extraction Software
- Always verify the vendor’s privacy policy.
- Avoid tools that require cloud upload unless you fully trust the service.
Know exactly when free tools are enough — and when paying prevents costly data loss.
iPhone Restore from Backup: Complete Recovery Solutions
Restoring your iPhone from a backup ensures you can recover lost data after device replacement, reset, or software issues. Whether the backup is stored on your PC, Mac, or in iCloud, modern recovery options give you full control over what gets restored and how fast it happens.
iPhone Backup Restore from PC: Local Recovery Mastery
Step-by-Step Restore from Windows or Mac
- Connect your iPhone to the computer containing the backup.
- Windows (iTunes): Open iTunes > Select your device > Click Restore Backup > Choose the correct backup by date.
- Mac (Finder): Open Finder > Select your iPhone > Under “Backups,” click Restore Backup > Confirm.
- Wait for the process to complete before disconnecting.
Partial Restore Options
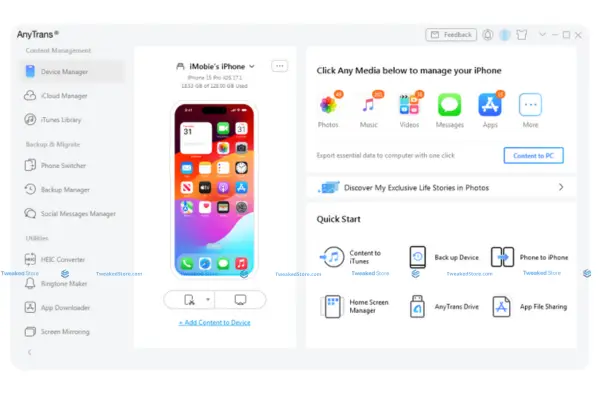
- Use third-party tools like iMazing or AnyTrans to restore only contacts, photos, apps, or settings without overwriting everything.
Cross-Device Restore
- You can restore an iPhone backup to an iPad and vice versa, but only compatible data (contacts, photos, messages) will transfer.
- App-specific data may not work across devices due to iOS/iPadOS restrictions.
Restore Without Erasing Current Data
- Selective restore tools allow you to add data from backups without wiping existing files — perfect for merging new contacts or recovering a lost photo album.
Complete or partial recovery from a local backup, with the flexibility to keep your current files intact.
iPhone Backup Restore from iCloud: Cloud Recovery Optimization
Restoring After Initial Setup
- When setting up a new or reset iPhone, choose Restore from iCloud Backup.
- Sign in with your Apple ID, pick the desired backup, and wait for apps/data to download.
Restoring to an Already Set Up iPhone
- Officially, Apple requires a factory reset before restoring from iCloud.
- For selective cloud restores without wiping your device, use extraction software to pull specific files from the iCloud backup.
Can I Restore My iPhone from iCloud After Setting It Up as a New Phone?
- Yes, but you must erase the phone first: Settings > General > Transfer or Reset iPhone > Erase All Content and Settings.
- Then follow the setup steps and select Restore from iCloud Backup.
iCloud Restore Speed Optimization
- Use a strong Wi-Fi connection (5 GHz preferred).
- Keep your iPhone plugged into power during restore.
- Pause large app downloads until critical files are restored.
Restore Without Erasing – Advanced Techniques
- Access iCloud data (photos, contacts, messages) via iCloud.com or iCloud Drive, then manually import into your device.
- Some apps (e.g., WhatsApp) offer in-app restore from iCloud without resetting the phone.
Flexible cloud-based recovery that works whether you’re starting fresh or adding missing files to an existing setup.
iPhone Backup Restore Contact Only: Selective Data Recovery
Extracting and Restoring Only Contacts from a Full Backup
- Use extraction tools like iPhone Backup Extractor or CopyTrans to pull contacts from iTunes or Finder backups.
- Import extracted contacts via vCard (.vcf) or iCloud Contacts.
Restoring Photos Without Affecting Other Data
- Open iTunes or Finder backup in extraction software, select Photos, and export them without initiating a full restore.
- Alternatively, retrieve photos from iCloud Photos directly on the iPhone.
App-Specific Restore Procedures for Business Apps
- Many business apps (Slack, Microsoft Teams, Dropbox) store data in the cloud — reinstalling the app and signing in restores files without a device-wide restore.
Message and Call History Selective Restoration
- WhatsApp, Signal, and Telegram support restoring messages from app-specific iCloud or Google Drive backups.
- For standard SMS/iMessage history, use partial restore features in backup management software.
Quickly recover only what you need without risking your current data or settings.
iPhone Restore Troubleshooting: Error Resolution Guide
When an iPhone backup restore fails, it’s usually due to connection, software, or hardware issues. Common errors like iPhone restore error 4013 or error 1109 can be frustrating, but with the right steps, you can quickly pinpoint the cause and get your device working again.
iPhone Restore Error 4013: Hardware vs. Software Solutions
USB Connection Troubleshooting
- Always use an original Apple Lightning cable.
- Try a different USB port — preferably USB 3.0 for stable data transfer.
- Avoid USB hubs; connect directly to the computer.
iTunes/Finder Update Requirements
- Outdated software often triggers Error 4013.
- Windows: Update iTunes via the Microsoft Store or Apple’s website.
- Mac: Update macOS to ensure Finder has the latest device drivers.
Hardware Diagnostics When Software Fixes Fail
- Test with another computer to rule out hardware damage.
- Inspect the charging port for debris or bent pins.
- Consider that persistent Error 4013 may indicate a faulty logic board or NAND chip.
Professional Repair vs. DIY Fixes
- If hardware is suspected, professional repair is safer — Apple-certified technicians have tools to run board-level diagnostics.
- DIY repairs are risky and may void the warranty, but port cleaning with isopropyl alcohol is a safe first step.
Prevents wasted time chasing software fixes when the real issue is hardware-related.
iPhone Restore Error 1109: Network and Authentication Issues
Network Troubleshooting for Restore Verification Failures
- Switch to a stable, high-speed Wi-Fi connection.
- Avoid public or restricted networks that block Apple’s verification servers.
Apple ID Authentication Problems
- Ensure the correct Apple ID is signed in during setup.
- If using Two-Factor Authentication, have a trusted device or phone number ready for the verification code.
Firewall and Antivirus Interference
- Temporarily disable antivirus or firewall software that may block iTunes/Finder from contacting Apple servers.
- On Windows, check Windows Defender settings for iTunes exceptions.
Alternative Restore Methods When Error 1109 Persists
- Restore using a different network (mobile hotspot, home fiber).
- Download the latest iOS IPSW file and restore manually in Finder or iTunes.
Keeps the restore process moving even when authentication or network issues block progress.
iPhone Restore Mode: Recovery Options and Best Practices
When to Use Recovery Mode vs. DFU Mode
- Recovery Mode: Ideal for most software issues and standard restores.
- DFU Mode (Device Firmware Update): Bypasses the boot loader for deeper fixes, useful when Recovery Mode fails.
Activating Restore Mode on Different iPhone Models
- iPhone 8 and later: Press and release Volume Up → Press and release Volume Down → Hold Side button until Recovery Mode appears.
- iPhone 7 series: Hold Volume Down + Side button together.
- iPhone 6s and earlier: Hold Home + Top (or Side) button together.
Data Preservation Strategies During Forced Restore
- Backup first if possible — Recovery and DFU Mode will erase data.
- For partial recovery, attempt selective restore tools before entering restore modes.
Post-Restore Optimization and Data Verification
- After restoring, check Settings > Apple ID > iCloud to confirm sync is active.
- Verify contacts, messages, and app data before wiping any old backups.
Ensures you choose the safest restore method while protecting as much data as possible.
Advanced iPhone Data Recovery: Beyond Standard Restore
Sometimes, a standard restore isn’t enough especially if you need deleted photos recovered or a corrupted backup repaired. In these cases, advanced iPhone recovery strategies can help you retrieve lost files, fix damaged backups, and prepare your device for a fresh start without losing essential data.
iPhone Restore Deleted Photos: Comprehensive Recovery Methods
Photo Recovery from Backup Files Without Full Restore
- Use tools like iMazing or iPhone Backup Extractor to open iTunes/Finder backups and export only your photos.
- This avoids overwriting your current iPhone data during recovery.
Third-Party Photo Recovery Tools: Effectiveness and Safety
- Disk Drill and PhoneRescue can recover deleted photos directly from the iPhone’s storage or from backup files.
- Always download from official websites to avoid malware or data leaks.
Recently Deleted Album: Extended Recovery Beyond 30 Days
- Photos remain in the Recently Deleted album for 30 days before being permanently erased.
- If the 30-day limit has passed, your only options are backups or specialized recovery tools.
iCloud Photos Recovery vs. Local Backup Restoration
- iCloud Photos: Restore from the cloud by logging into iCloud.com and downloading photos to your computer or device.
- Local Backup: More comprehensive, as it can include media not stored in iCloud at the time of deletion.
Restores your photo collection while keeping existing files safe and untouched.
iPhone Backup Recovery: Corrupted File Restoration
Backup File Corruption Detection and Early Warning Signs
- Failed restore attempts, unusually small backup file sizes, or missing timestamps in iTunes/Finder can indicate corruption.
Professional Data Recovery Services: When to Seek Help
- If backups are unreadable and contain critical data, services like DriveSavers or Ontrack can attempt deep-level recovery.
- Ideal for business-critical files or once-in-a-lifetime photos.
DIY Corrupted Backup Repair Tools and Success Rates
- Tools like Tenorshare iCareFone or Wondershare Dr.Fone can repair partial backup files and extract salvageable data.
- Success rates depend on the extent of corruption — hardware-level corruption is rarely fixable at home.
Preventive Measures to Avoid Backup Corruption
- Keep your computer’s OS and iTunes/Finder updated.
- Store backups on healthy drives with regular disk health checks.
- Avoid interruptions during backup processes.
Saves time and maximizes data recovery chances, even from damaged backups.
Restore iPhone to Factory Settings: Clean Slate Procedures
Complete Factory Reset vs. Selective Data Removal
- Complete Reset: Erases all data and settings — best for selling or gifting your iPhone.
- Selective Removal: Use Erase All Content & Settings but keep eSIM data or certain configurations (on newer iOS versions).
Pre-Reset Backup Verification
- Ensure backups are recent and complete before resetting.
- On iTunes/Finder: Check timestamps and run a test restore on a spare device if available.
Post-Reset Optimization
- After reset, update to the latest iOS before restoring apps and data.
- Calibrate battery health by fully charging and discharging once.
Factory Reset for Selling iPhone: Complete Data Sanitization
- Sign out of Apple ID, disable Find My iPhone, and perform a full reset.
- For extra security, restore the phone as new and overwrite with dummy data before resetting again.
Most Popular Tutorials
👉 iPhone Common Issues – Read More →
👉 iPhone Setup Tips 2025 – Read More →
👉 iPhone Hidden Features – Read More →
👉 iPhone Automation Tips – Read More →
👉 iPhone Productivity 2025 – Read More →
Cross-Platform Backup Solutions: iPhone, iPad, and Beyond
Modern backup strategies don’t have to be limited to a single device type. With the right tools and setup, you can restore an iPad from backup, download iPhone backups for offline use, and manage large-scale deployments in a business environment, all while keeping your data secure and accessible anywhere.
Restore iPad from Backup: iPhone-to-iPad Migration
Cross-Device Compatibility
- You can restore an iPhone backup to an iPad if both devices run compatible iOS/iPadOS versions.
- Apps designed for iPhone often scale to iPad, but some may require updates for optimal display and performance.
iPad-Specific Backup Considerations
- iPad backups may be larger due to media files, multitasking states, and app cache differences.
- Always check iCloud/iTunes/Finder storage space before migration to avoid restore failures.
Universal Backup Solutions
- Tools like iMazing and AnyTrans support both iPhone and iPad, allowing full or selective restores across devices.
- Hybrid solutions combine local backups for speed with cloud backups for redundancy.
Family Device Management
- Set up Family Sharing with a centralized iMac/Mac mini for automated backups of all household devices.
- Schedule backups during low-use hours to minimize disruption.
iPhone Backup Download: Remote Access and Portability
Downloading Backups for Offline Storage
- Local iTunes/Finder backups are stored on your computer, but you can copy them to external drives for safekeeping.
- Cloud-based backups (iCloud, Google Drive via third-party tools) can be downloaded for offline archiving.
Backup File Format Conversion
- Standard iTunes backups use .sqlite and .plist files, which can be converted or extracted for use on other platforms.
- Cross-platform utilities like Elcomsoft Phone Viewer can open iOS backups on Windows, macOS, or Linux.
Remote Backup Access
- Use secure VPN connections to reach backups stored on a home NAS or office server.
- Cloud storage services like Dropbox Business and OneDrive support remote file retrieval with multi-device sync.
Synchronization Across Multiple Devices
- Keep backups consistent by syncing via a NAS with RAID redundancy or using automated software like Resilio Sync.
Enterprise iPhone Backup: Scalable Business Solutions
MDM Integration
- Pair your backup process with Mobile Device Management (MDM) systems like Jamf or Intune for remote restore and compliance enforcement.
Compliance Requirements
- Businesses in regulated industries (finance, healthcare) must meet data retention and encryption standards such as HIPAA or SOX.
- Use backup solutions that support end-to-end encryption and role-based access controls.
Automated Backup Policies
- Set company-wide schedules that perform nightly backups to both local servers and cloud storage.
- Automate old backup pruning to save storage space while keeping required history.
Data Separation
- In mixed-use devices, use containerization to isolate personal and work data, ensuring personal files aren’t backed up to corporate servers.
Secure, compliant, and scalable backups that protect business continuity.
Frequently Asked Questions — iPhone Backup & Restore
1. How do I back up my iPhone using iCloud or a computer?
- iCloud Backup: Go to Settings > [your name] > iCloud > iCloud Backup, turn on “Back Up This iPhone”, then tap Back Up Now. Automatic daily backups run when your iPhone is locked, on Wi-Fi, and connected to power.
- Computer Backup:
- Mac (macOS 10.15 or later): Connect via USB, open Finder, select your device, and click Back Up Now. Optionally use Encrypt local backup for sensitive data.
- Windows or older macOS: Use iTunes — open it, select your iPhone, then click Back Up Now, and enable encryption if needed.
- Mac (macOS 10.15 or later): Connect via USB, open Finder, select your device, and click Back Up Now. Optionally use Encrypt local backup for sensitive data.
2. How do I restore an iPhone from a backup?
- From a Mac or Windows computer:
- On Mac: Use Finder.
- On Windows or legacy macOS: Use iTunes.
- Connect your device, choose Restore Backup, then select the desired backup and enter the password if the backup is encrypted.
- On Mac: Use Finder.
- From iCloud: Erase your device first (Settings > General > Transfer or Reset iPhone > Erase All Content and Settings). During setup, choose Restore from iCloud Backup, sign in, and select the backup.
3. Can I restore an iCloud backup without erasing my iPhone?
No, a full iCloud backup restore requires erasing the device first. However, you can selectively recover files like photos or contacts using backup extraction tools.
4. After setup, can I still restore an iPhone from a backup?
Yes, but only by erasing the device and restarting the setup process to select a backup option.
5. How do I fix “Restore Backup” or “Back Up Now” being greyed out?
This often happens because the device is busy (possibly backing up or restoring already). Restarting both your iPhone and your computer typically resolves the issue.
6. If I lose my iCloud storage or passcode, what can I do?
Without enough iCloud storage, backups will fail—use local backups or clear space. If you forget your passcode and can’t access your iPhone, you must erase the device and restore from a backup.
7. Can I restore apps without updating to the latest version?
When restoring from iCloud, the latest available version of each app is downloaded. Older versions are no longer restored unless still supported on your device.
8. Can I move backups between Windows and Mac or use cloud storage?
Yes. iTunes backups are portable across Windows and Mac and can be stored on shared drives or in cloud storage services for easier access.
9. Where does iTunes or Finder store backups?
Backups are stored in the MobileSync > Backup folder within your user profile. The exact location depends on your operating system.